
Voice Notes
Capture your thoughts quickly. Tap record, speak naturally, and let Cleft turn your voice into a structured note.Starting a Recording
- Tap the voice mark to begin recording. On iPhone and iPad it sits in the bar at the bottom of your notes. On Mac, use the record button at the bottom of the notes sidebar.
- Choose a note style if you want this note to use a different format
- Speak clearly into your device microphone
- Continue speaking - Cleft will capture everything
Choose what New Note creates
On iPhone and iPad, New Note is two buttons in the bar at the bottom of your notes: a pencil for a text note and the voice mark for a voice note. Tap the one you want. Touch and hold the voice mark to continue your last note or, where tasks are on, to speak a task, which is spoken and reviewed rather than typed into an empty form. On Mac, a pencil button sits beside the record button at the bottom of the notes sidebar, so you can start a text note without right-clicking. Hover over either button to see its keyboard shortcut. Right-clicking the record button still offers Continue Note. Handedness decides which of the two buttons sits on the outside, under your thumb.During Recording
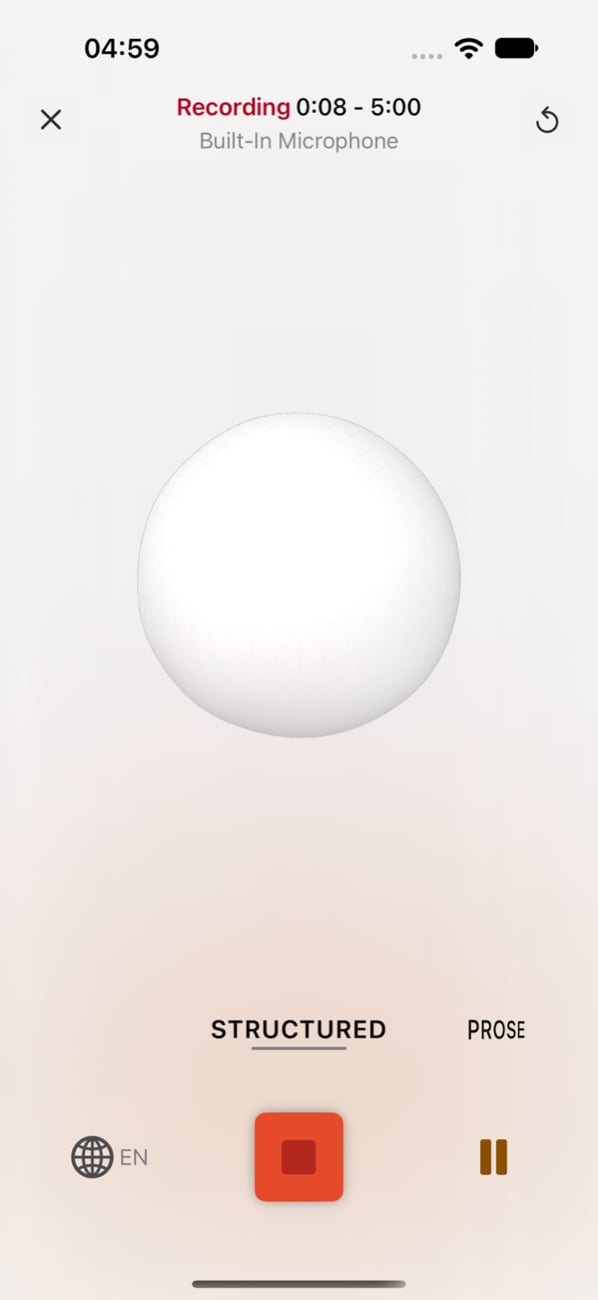
Changing language while you record
If you speak more than one language, add them in Settings → Recording → Languages I speak. With two or more there, the recording screen shows a language button that lists only those languages. With one, there is no language button. If you switch to another language part way through, tell Cleft. On iPhone and iPad, the language button sits beside Stop, on the side away from Pause, and shows the language in use. On a Mac, the language menu sits at the top of the recording window. Choose the language you are about to speak and keep talking. Every other language is under More Languages in the same menu. The change counts for this recording only. What you said before it stays in the first language, and the note keeps both. Your language in Settings stays as it was. A choice made before you start recording becomes your language in Settings too. On CarPlay, the sphere stays still beside the recording controls. On Apple Watch it pulses gently, and holds still while paused, when the screen dims, or with Reduce Motion turned on.- Pause recording by tapping the pause button, which sits on the side of Stop your thumb reaches first
- Resume recording by tapping the microphone again
- Restart your note by tapping the restart button, discards the current recording and starts fresh without leaving the recording screen
- Cancel recording by tapping the X, exits without saving
- Monitor recording time in the interface
- Choose a note style before you start, including Structured, Structured Prose, Clean Transcript, or a synced custom style
If the microphone stops
If the microphone cannot start, the recording screen shows an error instead of recording silence. On iPhone and iPad, Cleft pauses if it becomes unavailable part way through, for example because another app takes it. It carries on by itself when the microphone is back. If the microphone is still unavailable after that, Cleft can stop and save the audio so far. If Cleft can’t hear the microphone after trying again, it pauses and the recorder says why. Resume to try again. On iPhone and iPad, if Cleft is in the background when this happens, it stops and saves the audio so far. If you leave Cleft or lock the screen during this pause, it waits up to about 20 seconds so you can reconnect your microphone. Then it does the same and tells you when you come back. If microphone access is turned off, Cleft tells you and offers to open Settings so you can turn it back on. On Mac, starting a recording from the sidebar with microphone access off shows a prompt that opens System Settings.Stopping a Recording
- Tap the stop button when finished
- Cleft saves the recording and opens its note
- Progress appears inside the note while Cleft transcribes and prepares the summary
Longer Recordings
A recording can run for up to 5 minutes, or 30 minutes with Cleft Plus. Cleft may process a longer recording in short sections. In Cleft v1.15.0 or later, those sections stay in the order you spoke them and progress stays with the right note. If transcription stalls, Cleft keeps the recording ready to retry instead of saving an incomplete note or blocking your next recording. It tells you if a restart is needed. Quiet sections remain valid, so a natural pause does not count as a failure, and constant background noise no longer fills quiet stretches with words you never said.If a recording has no transcript
In Cleft v1.15.0 or later, Cleft automatically retries a saved recording whose text never arrived. The retry runs on device and does not need a connection, including for notes that were already stuck showing No text available before you updated. If recovery is impossible, the note says whether its audio file is missing or its text could not be produced while the recording remains saved. It then stops retrying instead of looping forever. Tapping Retry also re-transcribes a blank transcript rather than repeatedly resending the same incomplete note.If the summary does not arrive
Sometimes Cleft has your transcript but cannot create the summary yet, for example because you are offline or the service is busy. The note opens on its Transcript tab so you can read what you said, with a message such as “Your recording is saved. Try creating the summary again shortly.” Offline, the message asks you to try again once you are back online. Use Retry summary on the note card when you are ready. If Cleft could not check whether a submitted summary is ready, use Retry summary inside the note.Audio Devices
Cleft works with your audio devices.Switch Devices Mid-Recording
On Mac, Cleft records from the input your Mac uses. Change it in Settings → General → Audio → Input Device or in macOS Sound settings at any time, even mid-recording, and Cleft keeps your recording whole. On iPhone and iPad, iOS routes audio automatically based on your connected devices.- AirPods / AirPods Pro. Automatic detection when connected
- Bluetooth headsets. Full support for calls and recording
- Built-in microphone. Always available as fallback
- Wired headphones. Detected when plugged in
Other Apps Can Use Audio
FaceTime, Spotify, and other apps work while Cleft is open. You can:- Listen to music while reviewing notes
- Take a call without closing Cleft, which pauses a recording on iPhone and iPad until the call ends
Recording Tips
- Speak at a moderate pace for better transcription
- Use quiet environments for clearer audio
- Pause between topics to create natural breaks
- Speak directly toward the microphone for best results
- Don’t worry about silence. Cleft filters out phantom transcription artifacts (like false “Thank you” at the end of recordings)
Cleft transcribes in parallel while you speak. Longer recordings, or a section that needs another attempt, may take a little longer after you stop.
Text Notes
Can’t speak? Type instead. Cleft processes text notes the same way.1
Create new text note
On Mac, select the pencil button at the bottom of the notes sidebar, next to the record button. On iPhone and iPad, tap the pencil in the bar at the bottom of your notes. With a keyboard, press
⌘ + N2
Save your note
When you’re done, select the Save button (
⌘ + ⏎)3
Read your saved input
Your words stay visible while Cleft prepares the note. You can open another note while it finishes
If Cleft says your notes need recovery
Cleft keeps a copy of your notes on your device. If an update cannot move that copy to its new format, Cleft keeps the original untouched and shows Your notes need recovery instead of opening a damaged library. New voice and text notes stay unavailable until recovery succeeds, so nothing new lands in a copy that might not be kept.- Retry checks the protected copy again. If it works, close and reopen Cleft to load your notes.
- Export Recovery Copy lets you share a copy of the protected notes file, so you can keep it somewhere safe or send it to support.
- Contact Support opens the support page in the in-app guide.